
I’ve seen lots of comments from forums and MultiChoice social media platforms. Recently, most questions are on how to run the DStv installation wizard, especially step 4 of 5. With information gathered so far, step 4 of 5 is the most searched about. Thereby making us to understand that it get stuck on step 4.
In this post, I’ll walk you through steps to configure the installation wizard yourself. All you have to do is go through the content without skipping a line as it could be the fix for DStv error. But first, before getting started let’s look at what is installation wizard on DStv. Detailed Explanation Of All 3 Lights Flashing On Dstv Decoder & fixes
What Is Installation Wizard On Dstv
If you are setting up a satellite decoder, you must have come across an assistant that enables you to connect to satellite. So, DStv installation wizard is an assistant menu which gives you access to decoder settings and for a better connection to the satellite dish. The installation guide will also appear after resetting your decoder.
Knowing how to clear DStv installation wizard will reduce the cost of running your satellite TV. Here are some other things to to using the installation wizard; identifying the LNB type, name of satellite depending on your country, language and how to setup. How to fix dstv not scanning & decoder not booting up or working Properly
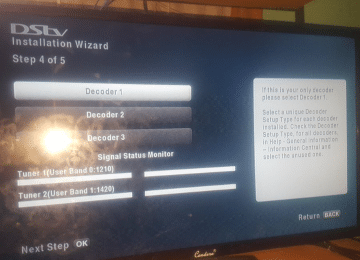
How To Run DStv Installation Wizard
- Hit the “blue DSTV button” on your remote
- Press the right navigation button to go to “Settings”
- navigate down to “Satellite Settings”
- Select “Home Network”
- And click on “Launch Installation Wizard” after that, press the “OK” button.
- Select the satellite that matches your country.
- Go to “Manual Setup” for the HD decoder
- In step 3 of the installation wizard, ensure you select “universal” as the LNB
- Click on “Scan” and then press “OK”on the remote. If the blue bar do not show up, there could be signal problem.
- Wait until its done scanning. And there it is, you are done with running the DStv installation wizard.
Now you are done with the setup. This is exactly how you can easily run the wizard yourself without assistant. However, if there is no signal, you will see a an error message which reads “This function cannot be performed as the signal strength is low“. It could be as a result of bad weather or faulty connection during installation.
To fix no signal problem, follow these guide on how to fix signal strength on DStv. That’s it, thanks for reading.

Frenzy valentine is a passionate blogger, developer, and entrepreneur. He is the founder and author of myfreshgists.com.
There is no signal this may be due to bad weather E48-32