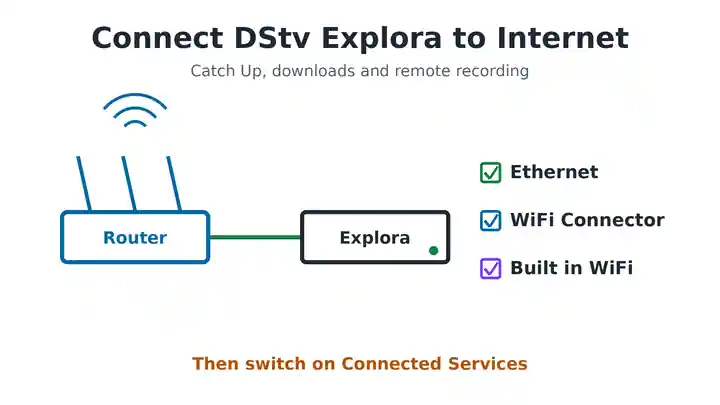
To connect DStv Explora to internet, you have three options. Use an Ethernet cable from your router, the DStv WiFi Connector on older models, or the built in WiFi on the Explora Ultra. Start the setup by pressing the blue DStv button and opening Settings, then System Settings, then Connectivity Set-up. Then switch on Connected Services, because they are off by default.
Once your Explora is online, you can watch Catch Up shows, download content to the decoder and set recordings remotely. This guide walks through each method step by step, then shows how to fix a connection that will not work.
What You Need Before You Start
- A working internet connection. DStv recommends an uncapped plan, because Catch Up and downloads use a lot of data. Data charges apply, even for downloads that fail.
- Your router switched on and online. Test it with your phone first.
- Your Explora and its remote.
- An Ethernet cable for the wired method, or a DStv WiFi Connector for older Exploras without WiFi.
DStv Explora internet speed requirements
DStv lists these minimum speeds:
- At least 2Mbps for downloads and remote recording.
- At least 4Mbps to watch in SD.
- 10Mbps recommended to watch in HD.
Slow internet is the most common reason Catch Up buffers. If your plan is close to these numbers, a wired connection helps a lot.
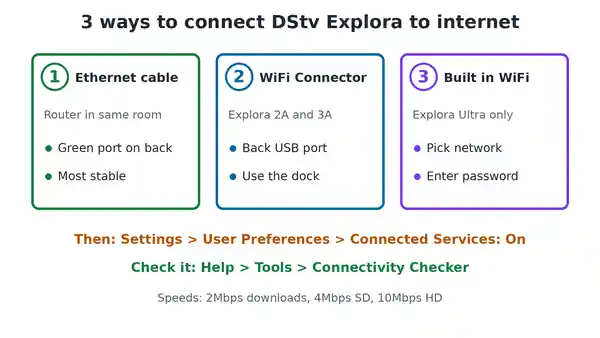
Which Connection Method Should You Use?
- Router in the same room: use an Ethernet cable. DStv calls it the most stable option.
- Router in another room, Explora 2A or 3A: use the DStv WiFi Connector.
- Explora Ultra: use its built in WiFi, or a cable if the router is close.
Not sure which model you have? Our guide to DStv Explora decoder issues explains how to tell the models apart.
How to Connect DStv Explora With an Ethernet Cable
This is the simplest and most reliable method.
- Press the blue DStv button on your remote.
- Go to Settings, then System Settings, then Connectivity Set-up.
- Plug one end of the Ethernet cable into the green Ethernet port on the back of the Explora.
- Plug the other end into a free LAN port on your router.
- The Explora runs its setup wizard and tests the connection by itself.
If the router is a little too far away, a longer Ethernet cable is still cheaper and more stable than WiFi. You can run it along the skirting board.
How to Connect DStv Explora With the WiFi Connector
The DStv WiFi Connector is a small USB adapter that gives older Exploras a wireless connection. It comes with a docking station so it can sit away from the decoder.
- Make sure your router is on and connected to the internet.
- Press the blue DStv button, then go to Settings, then System Settings, then Connectivity Set-up.
- Plug the docking station cable into the USB port on the back of the Explora. Do not use the side USB port.
- Put the WiFi Connector into the docking station. Place the station near the decoder, not on top of it. The light on the Connector turns solid white when it has power.
- The Explora searches for WiFi networks. Select your network and press OK, then press OK again to connect.
- Enter your WiFi password with the number buttons, or press ALT to open the on screen keyboard.
- The decoder tests the internet connection and confirms when it is done.
You can plug the Connector straight into the back of the Explora without the docking station. DStv warns that this may weaken the WiFi signal, so use the docking station if you can.
If your password has unusual characters
The on screen keyboard does not include every symbol. If your WiFi password uses a character you cannot type, change the password on your router to one with letters and numbers only.
Using WPS instead
DStv also lists a WPS method. If your router has a WPS button, press it on the router and on the Connector, then wait about two minutes for them to pair. This setup links the Connector to the Explora with an Ethernet cable instead of the USB dock.
How to Connect DStv Explora Ultra to WiFi
The Explora Ultra has WiFi built in, so you do not need the Connector. Open the connectivity or network settings from the DStv menu, let the decoder scan for networks, select yours and enter the password. The Ultra also has an Ethernet port if you would rather use a cable.
Once it is online, the Ultra can also run apps such as Netflix and Prime Video, which need their own subscriptions.
Switch On Connected Services
This is the step most people miss. Connected Services are switched off by default, so Catch Up and remote recording will not work until you turn them on.
- Press the blue DStv button.
- Go to Settings, then User Preferences, then Connected Services.
- Turn on the services you want. Highlight an option to see a short explanation of what it does.
How to Check Your Explora Internet Connection
The Explora has a built in Connectivity Checker.
- Press the Help button at the bottom right of your remote.
- Select Tools, then Connectivity Checker, and press OK.
- Green ticks next to the router and internet connection mean everything is working.
A red mark next to the router means the decoder cannot reach your router. A red mark next to the internet means the router is reached, but it has no internet.
DStv Explora Not Connecting to Internet
Work through these fixes in order:
- Test the internet on another device. If your phone cannot browse on the same WiFi, the problem is the router or your internet plan.
- Restart the router and the Explora. Switch both off, wait a minute, then switch the router on first.
- Reseat the cable. Push the Ethernet cable in firmly at both ends, or try another LAN port on the router.
- Move the WiFi Connector closer. If your network does not appear, move the docking station closer to the router.
- Check the password. WiFi passwords are case sensitive. If you see an incorrect password error, clear it and try again.
- Repeat the setup after router changes. If you changed your router, network name or password, run Connectivity Set-up again.
- Use the back USB port. The Connector will not work properly from the side port.
- Check Connected Services. A connected decoder still shows nothing if these are switched off.
If the WiFi signal is weak because the router is far away, see our guide on installing a long range WiFi antenna. For a slow connection in general, our tips on fixing slow internet speed can help.
What You Get When Your Explora Is Online
- Catch Up: watch past episodes and box sets. What you can watch depends on your DStv package.
- Downloads: save Catch Up content to the decoder to watch later. Downloads use storage space on the hard drive.
- Remote recording: set recordings from your phone while you are away from home.
- Apps on the Ultra: Netflix, Prime Video and the DStv app with live channels.
You can also watch on your phone or laptop without the decoder. See our guide on how to watch DStv live online.
Ethernet or WiFi for DStv Explora?
Choose Ethernet whenever you can. A cable gives the decoder a steady speed, and it is not affected by walls, microwaves or neighbours on the same WiFi channel. That matters most when you stream in HD, because it needs a steady 10Mbps.
WiFi is the better choice when the router is in another room and running a cable is not practical. To get the best from it, keep the WiFi Connector’s docking station in the open, away from metal cabinets and the back of the TV. If the signal is still weak, move the router closer or add a WiFi extender near the decoder.
Whichever method you use, run the Connectivity Checker after any change. It takes a few seconds and confirms the decoder can still reach the internet.
Common Questions
Does the DStv Explora have built in WiFi?
Only the Explora Ultra. The Explora 2A and 3A need an Ethernet cable or the DStv WiFi Connector.
Why is DStv Catch Up not working on my Explora?
Usually the decoder is not online, or Connected Services are switched off. Run the Connectivity Checker, then turn on Connected Services under User Preferences.
How much data does DStv Explora use?
It depends on how much you stream and download. HD uses far more than SD, which is why DStv recommends an uncapped internet plan.
Do I need the internet to watch normal DStv channels?
No. Live channels still come through the satellite dish. The internet only adds Catch Up, downloads, remote recording and apps.
Connect DStv Explora to Internet in Minutes
To connect DStv Explora to internet, choose a cable if the router is close, the WiFi Connector for older models or the built in WiFi on the Ultra. Run Connectivity Set-up, switch on Connected Services and check the result with the Connectivity Checker. If channels or the decoder itself are giving you trouble, see our guide to fixing a DStv decoder that is not scanning or booting. For DStv’s own instructions, visit the DStv Get Connected page.

Frenzy valentine is a passionate blogger, developer, and entrepreneur. He is the founder and author of myfreshgists.com.