Connecting your DStv Explora to the internet is what unlocks the best part of the decoder. Once it is online, you can stream Catch Up and Box Sets, watch Showmax content on supported packages, and set your decoder to record shows remotely while you are away from home. The good news is that it is a quick setup, and there are now three ways to do it depending on which Explora you own and where your router sits.
This guide covers all three methods — Ethernet cable, built-in WiFi on newer decoders, and the DStv WiFi Connector for older ones — with the exact remote-control steps that work in 2026.
What you need before you start
Whichever method you choose, get these ready first:
- An active, uncapped home internet connection.
- Your WiFi router switched on and working.
- Your DStv Explora and remote.
- For the wired method, an Ethernet cable.
For speed, DStv recommends a minimum of 2Mbps for downloads and remote recording, around 4Mbps for standard-definition viewing, and 10Mbps or more for the best HD experience. Slow internet is the most common reason streaming and Catch Up buffer, so a steady connection matters more than anything else here.
Method 1: Connect DStv Explora using an Ethernet cable
If your Explora sits in the same room as your router, this is the most stable option. A wired connection avoids the interference that affects WiFi, so it is the method DStv recommends when it is practical.
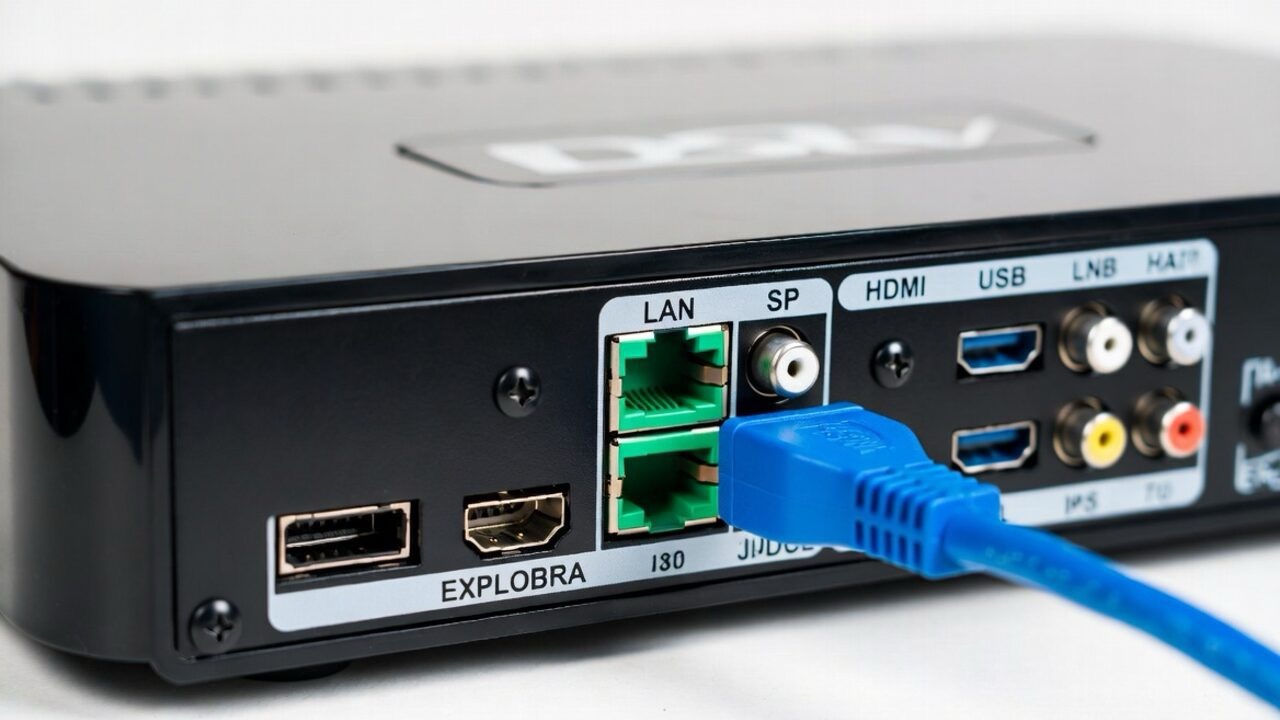
- Plug one end of the Ethernet cable into the green Ethernet port at the back of your Explora.
- Plug the other end into any available LAN port on your router.
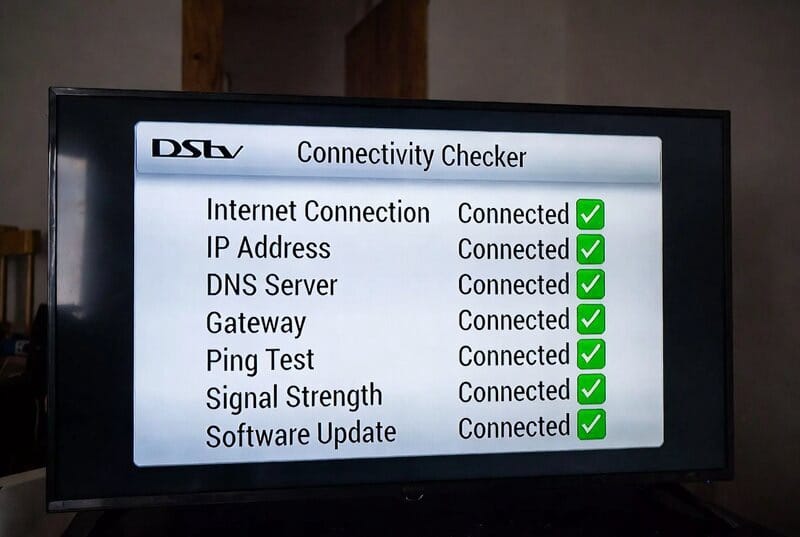
- Check the connection: press the Help button on your remote, select Tools, then Connectivity Checker, and press OK. You should see green checkmarks confirming both the router and internet connections are successful.
- Switch on your connected services. By default they are all off. Press the blue DStv button, go to Settings > User Preferences > Connected Services, and turn on the services you want.
Method 2: Connect a newer Explora using built-in WiFi
If you have a newer decoder such as the DStv Explora Ultra, it has WiFi built in — no extra accessory needed. You connect it straight to your home network:
- Press the blue DStv button and go to your decoder’s network or connectivity settings.
- Let the Explora scan for available WiFi networks and select yours from the list.
- Enter your WiFi password and confirm.
- Run the Connectivity Checker (Help > Tools > Connectivity Checker) to confirm, then switch on Connected Services as in Method 1.
Not sure whether your decoder has built-in WiFi? If there is no WiFi network option in the menu, your model does not have it, and you should use Method 1 or Method 3 instead.
Method 3: Connect an older Explora using the DStv WiFi Connector
If your router is in another room and your Explora does not have built-in WiFi, the DStv WiFi Connector bridges the gap wirelessly. It is a small adapter that plugs into the decoder.
- Place the WiFi Connector (in its docking station) next to the Explora, not on top of it.
- Connect the docking station’s power cable to one of the USB ports on the back of the Explora.
- Insert the WiFi Connector into the docking station. The LED on the front turns solid white once it has power.
- The Explora automatically scans for WiFi networks. Use your remote to select your home network and press OK.
- If your network is password-protected, enter the password to complete the connection.
- Confirm with the Connectivity Checker, then switch on your Connected Services.
If you are setting the Connector up for the first time and it will not pair, DStv also provides a browser-based setup at its dstvwifi address, but for most people the on-screen wizard above is all that is needed.
Why connect your Explora to the internet at all?
Plenty of people never bother, and they miss the features that make the Explora worth having. Once online you get Catch Up Plus for binge-watching past episodes, access to Showmax content on supported packages, the ability to schedule and manage recordings remotely, and a generally smarter decoder. If you have been wondering why your Catch Up library looks empty, an unconnected decoder is almost always the reason.
Troubleshooting: Explora not connecting to the internet
If the Connectivity Checker shows a red mark instead of green, work through these in order:
- Confirm your router actually has working internet by testing another device on the same network.
- Reseat the Ethernet cable at both ends, or move the WiFi Connector closer to the decoder.
- Restart both the router and the Explora, then run the checker again.
- Double-check you entered the correct WiFi password — it is case-sensitive.
- If services still will not load after a successful connection, make sure Connected Services are switched on, since they default to off.
Frequently asked questions
Does the DStv Explora have built-in WiFi?
Newer models like the Explora Ultra do. Older Explora models do not and need either an Ethernet cable or the DStv WiFi Connector to get online.
Is the DStv WiFi Connector still available?
Yes. It is still used to connect older Exploras that lack built-in WiFi. Only the newest decoders skip it because they connect to WiFi directly.
What internet speed do I need for DStv Catch Up?
About 2Mbps minimum for downloads and recording, 4Mbps for SD viewing, and 10Mbps or more for smooth HD.
Why is my DStv Catch Up not working?
The most common cause is that the decoder is not connected to the internet, or Connected Services are switched off. Run the Connectivity Checker and make sure your services are turned on.
Can I connect my Explora to WiFi without the connector?
Only if your model has built-in WiFi. Otherwise you need the WiFi Connector or a wired Ethernet connection.
Also helpful: Easy steps to run the DStv installation wizard yourself and how to fix DStv not scanning or a decoder not booting up properly.
For the official requirements, see DStv’s own connection guide.

Frenzy valentine is a passionate blogger, developer, and entrepreneur. He is the founder and author of myfreshgists.com.