Last updated: July 2026
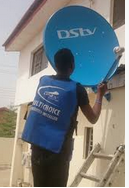
Installing a DStv satellite dish yourself is well within reach if you take it in order. The work splits into three parts: mounting the dish securely, aiming it at the satellite, and connecting it to your decoder. Rush any one of them and you end up with a blank screen and no idea which stage went wrong.
This guide covers the physical installation from start to finish. Aiming the dish is a job of its own, so it gets its own section and a link to the full method further down.
What You Need
Gather everything before you climb anything. Making repeat trips up a ladder is how installations go wrong.
- The DStv dish kit, which includes the reflector, the LNB, and the mounting bracket
- A DStv decoder, supplied by DStv or an accredited dealer
- RG6 coaxial cable, long enough to reach from the dish to the decoder
- At least two F connectors
- A mast or pole, if you are not mounting to a wall
- A spirit level
- A ring or flat spanner and a screwdriver
- Cable clips and a cable cutter or pliers
- Self-amalgamating tape or weatherproof tape
- A surge protector for the decoder
If you plan to set a pole into the ground rather than fixing it to a wall, you will also need cement, sand, stones, water, a trowel, and something to dig with.
One clarification worth making. Your decoder must be a DStv decoder. Generic free-to-air receivers sold under other brand names will not decode DStv’s encrypted channels, regardless of how well the dish is installed.
Choosing Where to Mount the Dish
This decision matters more than any other, because a badly placed dish cannot be rescued by careful work later.
DStv in Nigeria receives its signal from a satellite positioned at 36 degrees east, sitting above the equator. From anywhere in Nigeria, that means the dish looks east and somewhat south, tilted fairly high into the sky.
So the line you must keep clear runs east-southeast from the dish, not south. Ignore guidance that tells you to clear the southern sky, since that advice comes from American satellite systems and points in the wrong direction here.
Stand where you intend to mount the dish and look along that line. Trees, walls, neighbouring buildings, and water tanks all block satellite signal completely. Leaves matter too, since a branch that is bare now will thicken and cut your signal in a few months.
Height helps, but a clear line of sight helps far more. A dish mounted low with nothing in front of it will outperform a dish mounted high with a tree in the way.
Step One: Mount the Pole or Bracket
If you are fixing to a wall, mark the bracket holes, drill them, and fasten the bracket with appropriate wall screws or bolts. Choose a solid wall rather than a thin fascia board, since the dish must not move once aimed.
If you are setting a pole into the ground, dig your hole, stand the pole in it, and set it in concrete. Give the concrete a full day to cure before you hang anything on it.
Whichever method you use, check the pole is perfectly vertical with a spirit level, testing two sides at right angles to each other. This step gets skipped constantly and it causes a surprising number of failed installations. Every aiming adjustment you make later is measured against that pole. If the pole leans, your dish leans with it, and no amount of adjusting will find the satellite cleanly.
Step Two: Assemble and Fit the Dish
Attach the mounting bracket to the back of the reflector, following the orientation shown in the kit. The bracket has markings that let the dish tilt up and down, so make sure it is fitted the right way up.
Lift the dish onto the pole and slide the bracket over it. Tighten the clamp bolts by hand until the dish holds its position but can still be moved with firm pressure. Do not lock it down yet. You will need to move it during aiming.
Step Three: Fit the LNB
The LNB is the small device that sits at the end of the arm in front of the dish. It collects the reflected signal and passes it down the cable.
Slide the LNB into its holder at the end of the arm and tighten the clamp lightly. Like the dish itself, it needs to rotate during aiming, so leave it loose enough to turn.
Check the LNB is seated the correct way round. Most have a marking showing which way is up. An LNB fitted upside down will still receive a signal, but a much weaker one, and that weakness will only show up as freezing pictures during rain months later.
Step Four: Run and Connect the Coaxial Cable
Fit an F connector to one end of your RG6 cable. Strip about a centimetre of the outer sleeve, fold the braided shielding back over the cable, and twist the connector on firmly. The solid copper centre wire should pass through and poke out slightly at the tip.
The centre wire and the braided shielding must never touch each other. A single stray strand of braid touching the centre pin creates a short circuit, and a short kills the signal entirely.
Screw this end into the LNB and hand-tighten it. Run the cable down the pole and along to where the decoder sits, securing it with cable clips as you go. Keep the run as short as you sensibly can, since every extra metre loses a little signal.
Avoid sharp right-angle bends. Coaxial cable performs poorly around tight corners, so use gentle curves instead. Before the cable enters the building, leave a small downward loop in it. Rainwater then drips off the bottom of the loop rather than running along the cable and into your wall.
Step Five: Weatherproof the Connection
Wrap the connector at the LNB with self-amalgamating tape until the joint is completely covered. Work from below upward, overlapping each turn, so water runs off rather than into the wrap.
This is the step people skip, and it is the reason so many dishes work perfectly for a season and then start dropping out whenever it rains. Moisture inside a connector corrodes it slowly and quietly. Sealing it properly on installation day saves you a return trip up the ladder in a year.
Step Six: Connect the Decoder
Fit an F connector to the indoor end of the cable and screw it into the port marked LNB IN on the back of the decoder. Turn it clockwise until it is hand-tight. Do not use a spanner, since the thread is fine and strips easily.
Connect the decoder to your television using an HDMI cable if the television has an HDMI port, which gives the sharpest picture. If the television is older, use the AV cable and match the colours exactly. Yellow carries video, red and white carry audio.
Plug the decoder into a surge protector rather than straight into the wall. A single voltage spike can destroy a decoder, and a surge protector costs a fraction of a replacement.
Aiming the Dish
Everything so far was preparation. Aiming is what actually makes the dish work, and it is precise work rather than guesswork.
You need three numbers for your exact location. Azimuth is the compass direction to the satellite. Elevation is how high the dish tilts. Skew is how far the LNB rotates in its holder. A free dish pointing calculator gives you all three once you enter your address and select the DStv satellite.
With those numbers, set elevation first, then swing the dish slowly through the azimuth reading in small increments while someone watches the signal meter on the decoder’s setup screen. Satellite signals are narrow, so moving too quickly sweeps straight past the satellite without the decoder registering it.
Because aiming deserves proper treatment, our guide on how to align a satellite dish without a meter walks through the full method using nothing more than your decoder’s own signal screen and a smartphone. Work through that before you tighten anything permanently.
Once the signal quality reading peaks, tighten the dish clamps, the LNB clamp, and the pole bolts. Check the reading once more afterwards, since tightening can nudge the dish slightly off its best position.
First Power On and Activation
Switch on the television, select the correct input, and power up the decoder. Let it search for the satellite and download its channel guide, which can take a few minutes on a fresh installation.
A new decoder still needs its account activated and a package paid before channels open. You will need the smartcard number, printed on the card itself and visible in the decoder’s information menu.
If channels do not appear after activation and payment, the decoder often just needs a fresh authorisation signal rather than another payment. Our guide on clearing DStv error codes E16, E19, E30 and E32 explains what each on-screen code means and which ones a reset will actually fix.
Mistakes That Ruin an Otherwise Good Install
A leaning pole is the most common. Everything downstream inherits the error, and the dish never quite locks on.
Overtightening comes second. The clamps and connectors are not designed for spanner force. Cracked plastic and stripped threads cannot be undone.
Skipping the weatherproofing feels harmless on a dry day and costs you a working dish within a year.
Finally, aiming by eye alone almost never works. The satellite occupies a narrow window in the sky, and a couple of degrees of error is the difference between a perfect picture and nothing at all. Use the numbers and use the signal screen.
A DStv dish installed properly will run for years with nothing more than an occasional check of the bolts and the cable seal. Get the pole vertical, keep the east-southeast line clear, seal every outdoor joint, and aim with real numbers rather than instinct. For current package details, decoder options, and accredited installers near you, the official DStv Nigeria website is the place to confirm before you buy anything.

Frenzy valentine is a passionate blogger, developer, and entrepreneur. He is the founder and author of myfreshgists.com.