If your GOtv antenna is giving you trouble, this guide covers the full picture: assembling the GOtenna from scratch, mounting it correctly, finding the strongest signal, and fixing the most common problems that kill your picture. Follow each step carefully and you will not need to call a technician.
What Comes in the GOtv Antenna Box
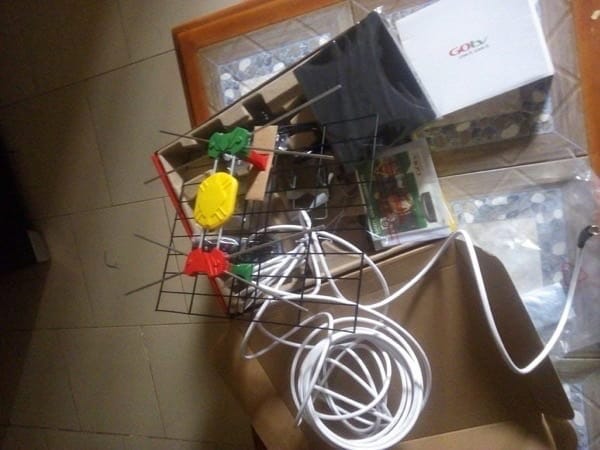
Before you start, lay out everything that came in the box so nothing gets lost. You should have the antenna grid, the yellow plastic signal receiver box, a green clip, a red clip, a U bracket, two pole brackets, wing nuts, and the coaxial cable.
If any part is missing, contact your GOtv dealer before you proceed. Trying to install with missing parts is one of the fastest ways to end up with zero signal.
How to Assemble the GOtv Antenna Step by Step
Assembly goes wrong for most people because they rush it. Take it one step at a time.
Step 1: Thread the coaxial cable through the antenna grid
Pull the coaxial cable through the opening at the centre of the antenna grid. Keep it straight as you pull. Do not bend or kink the cable at this point, because a kinked cable will reduce your signal even after everything else is assembled perfectly.
Step 2: Screw the cable onto the yellow plastic box
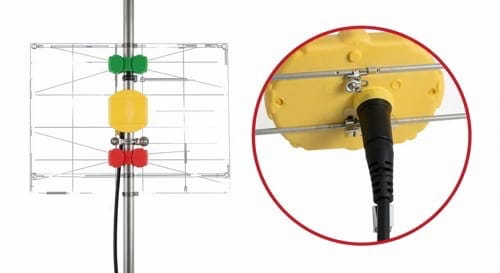
Once the cable is through the grid, attach it to the yellow plastic box by screwing it on clockwise. This yellow box is the signal receiver, and it is the most important part of the whole antenna. Make the connection firm. A loose cable here is one of the most common reasons people get zero signal or a weak flickering picture after a full installation.
Step 3: Slide the waterproof sleeve over the connection
Slide the rubber waterproof sleeve over the joint between the cable and the yellow box until it covers the connection completely. This step is easy to skip, but it matters a great deal if your antenna will be outdoors. Rain and moisture getting into that joint will corrode it over time and slowly destroy your signal.
Step 4: Clip the green and red boxes into their matching clips
On the antenna grid you will find a green clip and a red clip. Press the green plastic box into the green clip and the red plastic box into the red clip until each one clicks into place. Green goes to green. Red goes to red. If the clips are not clicking, check that you are pressing them in straight and that nothing is blocking the slot.
Step 5: Insert the U bracket through the centre of the antenna
Push the U bracket through the slot at the centre of the antenna grid. This bracket connects the antenna to the mounting pole, so make sure it sits flush against the back of the grid. If it is not seated properly, the antenna will wobble on the pole and your signal will keep shifting.
Step 6: Slide the first pole bracket over the U bracket
Slide the first pole bracket over the two ends of the U bracket, with the flat side sitting firmly against the back of the antenna grid. This creates the base that holds everything steady on the pole.
Step 7: Mount the antenna and check the arrow
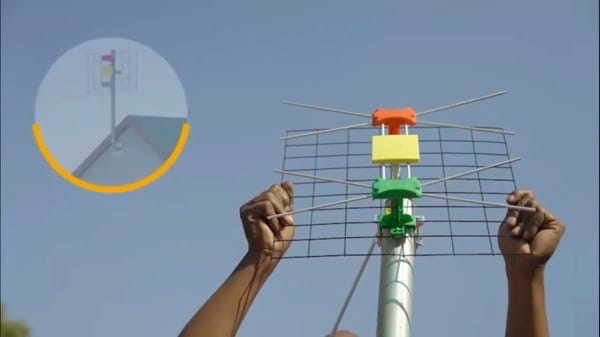
Hold the antenna up against your mounting pole and look for the down arrow printed on the yellow box. That arrow must point downward. This is not optional. If the antenna is upside down, you will get little or no signal regardless of which direction you point it.
Once the orientation is correct, fasten the second pole bracket around the pole and tighten the wing nuts firmly by hand. Do not use a spanner to overtighten them, because the brackets are plastic and will crack under too much force.
Step 8: Find the strongest signal direction and lock the antenna
This is the most important step in the entire installation and the one most people rush. Point the GOtenna in the general direction of the nearest GOtv transmitter. Then slowly rotate it a few degrees left, pause, and check the signal reading on your TV. Rotate right, pause, and check again. Keep adjusting until the reading peaks, then tighten everything down.
A useful trick is to have someone watch the signal screen on the TV while you adjust the antenna outside, so you get real-time feedback without running back and forth.
How to Check Your GOtv Signal Strength
Before you can fine-tune anything, you need to see the actual signal reading. On your GOtv remote, press Menu, scroll to Advanced Options, and select Signal Information. Two readings appear: signal strength and signal quality.
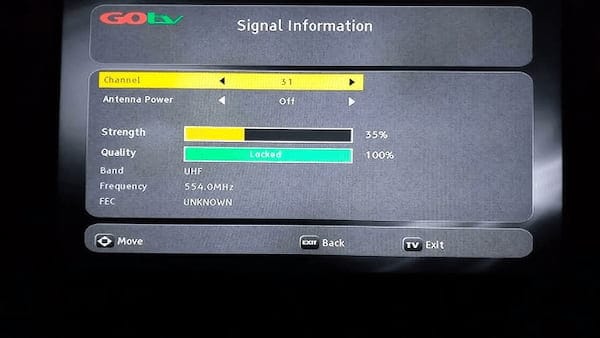
GOtv’s own installer standards define what counts as a healthy reading. MultiChoice’s official GOtv technical manual classifies 75 to 100 percent as a good signal, meaning your installation is set up correctly. A reading between 50 and 75 percent means the antenna is not aligned or positioned well, and anything below 50 percent is bad signal territory, where channels drop out and the picture breaks up.
So when you are rotating the antenna in Step 8, your target is a strength reading above 75 percent. If you can only reach the 50 to 75 range no matter how you aim, the problem is usually height, obstructions, or distance from the transmitter, which the tips further down address.
How to Connect the GOtv Decoder to Your TV
With the antenna assembled and pointing correctly, connecting the decoder takes just a few minutes. Plug the yellow RCA cable into the yellow Video IN port on your TV, the red cable into the red Audio IN port, and the white cable into the white Audio IN port. If your TV has an HDMI port, use an HDMI cable instead for a cleaner picture.
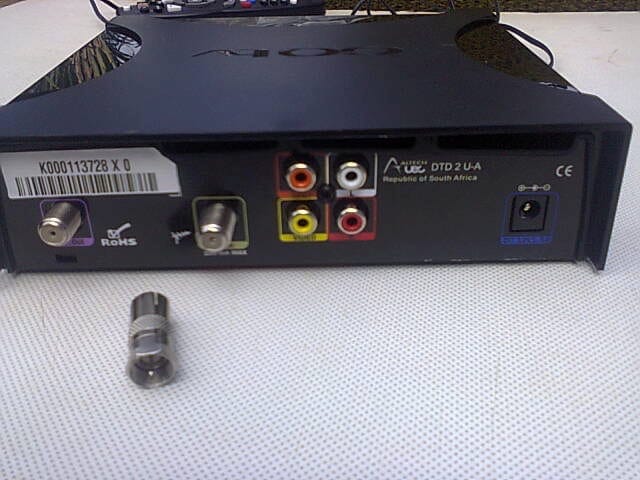
Take the coaxial cable from the antenna and plug it into the port labelled RF IN at the back of the decoder, screwing it in clockwise until firm. Plug in the power supply, switch on the TV, and press the AV or Source button on your remote to switch to the right input. Wait about 20 seconds for the GOtv logo to appear. If the decoder does not find channels automatically, go back to the antenna and fine-tune the direction while watching the signal screen.
GOtv recommends using a surge protector with the decoder, and this is genuinely good advice. A single power surge can damage the decoder permanently, and a basic surge protector costs very little compared to a replacement unit. For a more detailed walkthrough, see the full guide on how to install a GOtv decoder.
What Power Antenna Means in Your Decoder Settings
If you see an option called Power Antenna in your decoder settings, here is what it controls. A passive antenna, which is the standard GOtenna in the kit, needs no electricity and receives signal through its physical design alone. An active antenna has a built-in amplifier that boosts weak signals and draws power through the coaxial cable from the decoder.
If you are using the standard GOtenna, leave Power Antenna off. Only turn it on if you have connected a separate amplified antenna. Leaving it on with a passive antenna will not break anything, but off is the correct setting.
How to Fix Common GOtv Antenna Problems
GOtv showing no signal after installation
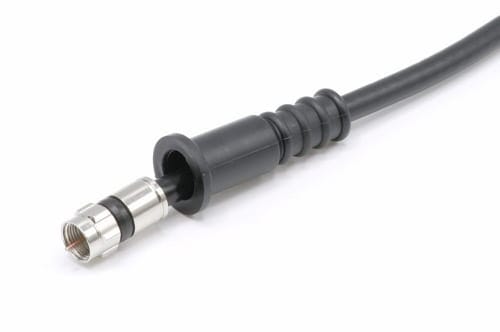
Start by checking the RF cable at the back of the decoder. Unscrew it and look at the small pin inside the connector. If it looks too short to make proper contact with the decoder port, use a small knife to carefully peel back a little of the outer cable sleeve to expose more of the pin. Screw it back in and check again. This fixes the problem more often than most people expect.
If that is not it, check the cable along its full length for sharp bends or visible damage, and replace it if necessary.
GOtv signal is weak or keeps dropping
Signal that comes and goes is almost always a positioning problem. Go outside and check whether anything has changed around the antenna. A new tree branch, nearby construction, or the antenna shifting slightly after wind can all knock your signal off. Loosen the wing nuts, realign while watching the signal screen, and retighten once the strength reading passes 75 percent.
GOtv signal strength showing 0
Zero signal means the decoder is receiving nothing at all from the antenna. Work through these in order: check the RF connector at the decoder, inspect the cable along its full run, check that the waterproof sleeve has not let water into the antenna connection, and confirm the green and red clips are still clicked into place. Also confirm the down arrow on the yellow box is still pointing downward.
GOtv signal drops when it rains
If your signal is fine in dry weather but weakens during rain, water is getting into the cable connection at the antenna. Seal the joint properly with the waterproof sleeve. If the antenna has been exposed for a long time without sealing, replace the section of cable near the antenna and reseal everything correctly.
For decoder-specific error codes, including the E48-32 searching-for-signal message, the full breakdown is in the guide on how to fix GOtv no signal and E48 errors.
Tips for the Best GOtv Signal
Mount the antenna as high as possible. Every metre higher reduces obstructions and gets you closer to a clear line of sight with the transmitter. Outdoor installation always beats indoor mounting for reliability.
Keep the coaxial cable run as short as you can, since every extra metre introduces a small amount of signal loss. Use gradual curves rather than sharp right-angle bends, because coaxial cable does not perform well around tight corners.
If you live far from a transmitter and the standard GOtenna cannot get you past the 50 to 75 percent range even at full height, GOtv’s own installer guidance recommends upgrading to a higher-gain antenna, which pulls in weaker signals that the standard kit antenna cannot. Any GOtv dealer can supply one, and everything else about the installation stays the same.
Finally, check all connections once a year. Outdoor joints loosen and corrode over time, and a quick annual look at the wing nuts, the waterproof sleeve, and the RF connector prevents most long-term problems before they start. Get the assembly right, aim for that 75 percent threshold, and keep water out of the connections, and this antenna will run for years without another thought.

Frenzy valentine is a passionate blogger, developer, and entrepreneur. He is the founder and author of myfreshgists.com.
1 thought on “How to Fix GOtv Antenna: Full Setup and Signal Guide”